Introduction
Amazon VPC endpoints enable you to access certain AWS services without the need to traverse the Internet or a VPN connection. VPC endpoints can be used to access a variety of AWS services. It will help you to improve security and performance.
There are two types of VPC endpoints. Here I’ll quote the AWS documentation.
- Interface endpoints: An interface endpoint is a collection of one or more elastic network interfaces with a private IP address that serves as an entry point for traffic destined to a supported service.
- Gateway endpoints: A gateway endpoint targets specific IP routes in an Amazon VPC route table, in the form of a prefix-list, used for traffic destined to Amazon DynamoDB or Amazon Simple Storage Service (Amazon S3). Gateway endpoints do not enable AWS PrivateLink.
Also their pricing is different. Gateway endpoints are completely free (so use those in your network blueprint!), while VPC interface endpoints cost money:
$0.011 per AZ ($/hour) + an additional charge for the amount of data processed by the endpoint: Monthly price for 1 interface endpoint, deployed over 3 AZs and processing 200GB of data each month (=730h) is $26,09 ($8.03 * 3 AZs + $2).
So it will get pricey when you add a lot of VPC interface endpoints to your network blueprint. It should be a well thought out decision. When you have a lot of traffic from within your VPC to some AWS services, it can become cost efficient to create a VPC interface endpoint for that service. VPC interface endpoints may also be necessary in order to comply with certain security standards that pertain to internal traffic.
Architecture
To save costs, you can centralize the VPC interface endpoints in a single VPC and connect all other VPCs in your organization to this VPC.
In the architecture below, each account has one VPC which routes to the same centralized VPC interface endpoints. In the architecture shown below, each account has one VPC that routes to the same centralized VPC interface endpoints. This will significantly reduce costs because we have observed that the majority of the cost is due to the number and existence of endpoints.
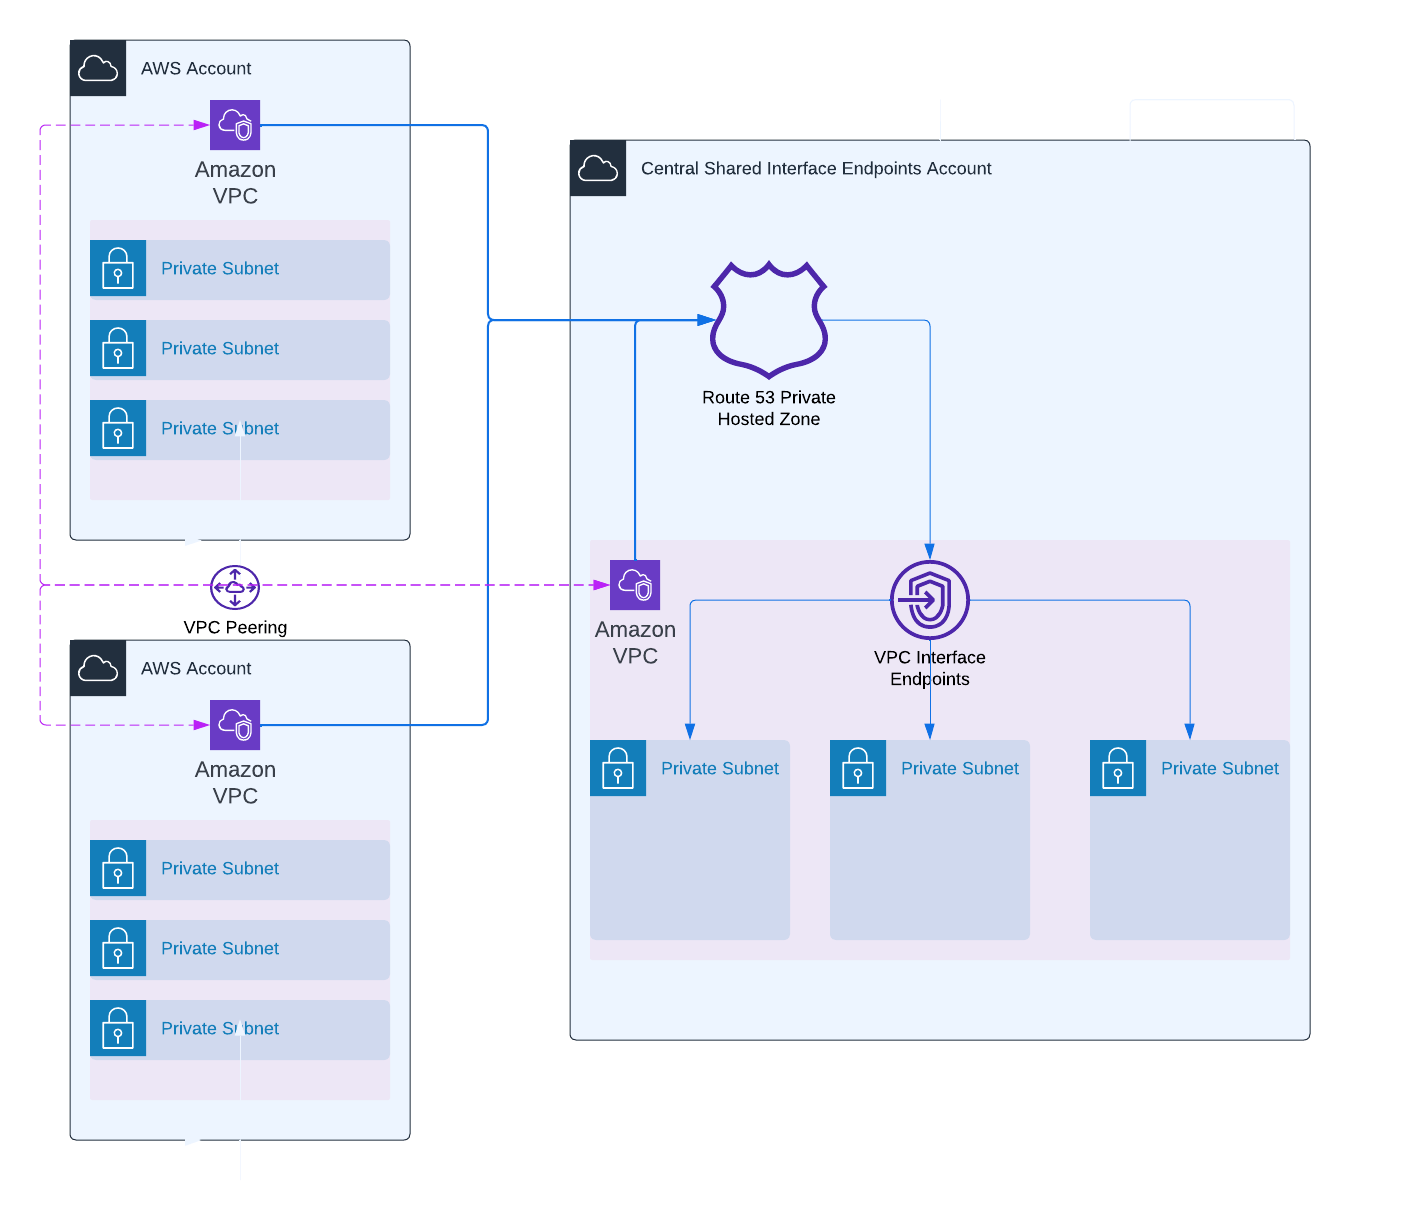
- We create 3 VPCs with 3 private subnets over 3 AZs in each account.
- We create VPC peering connections between our centralized VPC and the additional VPCs and vice versa.
- We create some VPC interface endpoints in the centralized VPC (with security groups which allow traffic from all VPCs).
- We create Route53 private hosted zones associated with our centralized VPC for each VPC interface endpoint and associate the zones also with all other VPCs.
- We update Route53 records to forward traffic to our VPC interface endpoints (e.g. forward traffic with destination
ssm.eu-west-1.amazonaws.comto DNS of the VPC endpoint.)
Terraform dependencies
To create this solution, you’ll need:
- The source code from GitHub.
- A cross-account deploy role (
assumed_role) - Terraform (AWS Provider dependency)
account-1: AWS account where we create a VPC with private subnets and VPC interface endpoints for each service defined invpc_endpoint_service_list.account-2: AWS account where we create a VPC with private subnets which is peered to the VPC inaccount-1. It makes use of the VPC interface endpoints deployed in the VPC ofaccount-1.account-3: AWS account where we create a VPC with private subnets which is peered to the VPC inaccount-1. It makes use of the VPC interface endpoints deployed in the VPC ofaccount-1.
This solution depends on an assumed_role variable. This should be the name of an IAM role which exists in each of the 3 accounts.
The account in which the interface endpoints are created should be able to assume those cross-account IAM roles.
The role should have the PowerUserAccess managed policy attached. It can be more restricted if you want to. The role is also required in account-1 (= account in which the interface endpoints are created).
We use the assumed_role to configure a provider for each of the 3 AWS accounts.
provider "aws" {
  alias  = "account_1"
  region = var.region
  assume_role {
    role_arn = "arn:aws:iam::${var.account_1["account_id"]}:role/${var.assumed_role}"
  }
}
Next, we use this provider to make clear which resource or module should be deployed to which AWS account. E.g. The VPC interface endpoints should be created in account-1.
resource "aws_vpc_endpoint" "vpc_interface_endpoints" {
  for_each          = toset(var.vpc_endpoint_service_list)
  provider          = aws.account_1
  vpc_id            = module.network-1.vpc_id
  service_name      = "com.amazonaws.${var.region}.${each.value}"
  vpc_endpoint_type = "Interface"

  security_group_ids = [
    aws_security_group.interface_endpoint_sgs[each.value].id,
  ]

  subnet_ids          = module.network-1.private_subnets
  private_dns_enabled = false
}
Some important drawbacks of Terraform providers:
Those drawbacks require me to “duplicate” resources. Instead of using dynamic solutions, I have to define a resource twice (with a different provider). This makes the solution less reusable, but it is still not too difficult to add VPCs/accounts."
Apply the Terraform code after you’ve updated the values.tfvars file:
$ terraform apply -var-file values.tfvars
...
Plan: 87 to add, 0 to change, 0 to destroy.

Do you want to perform these actions?
  Terraform will perform the actions described above.
  Only 'yes' will be accepted to approve.

  Enter a value: yes
...
Apply complete! Resources: 87 added, 0 changed, 0 destroyed.
There are 2 peering connections, one between account-1 and account-2, and one between account-1 and account-3

There are VPC interface endpoints for each service we have defined.

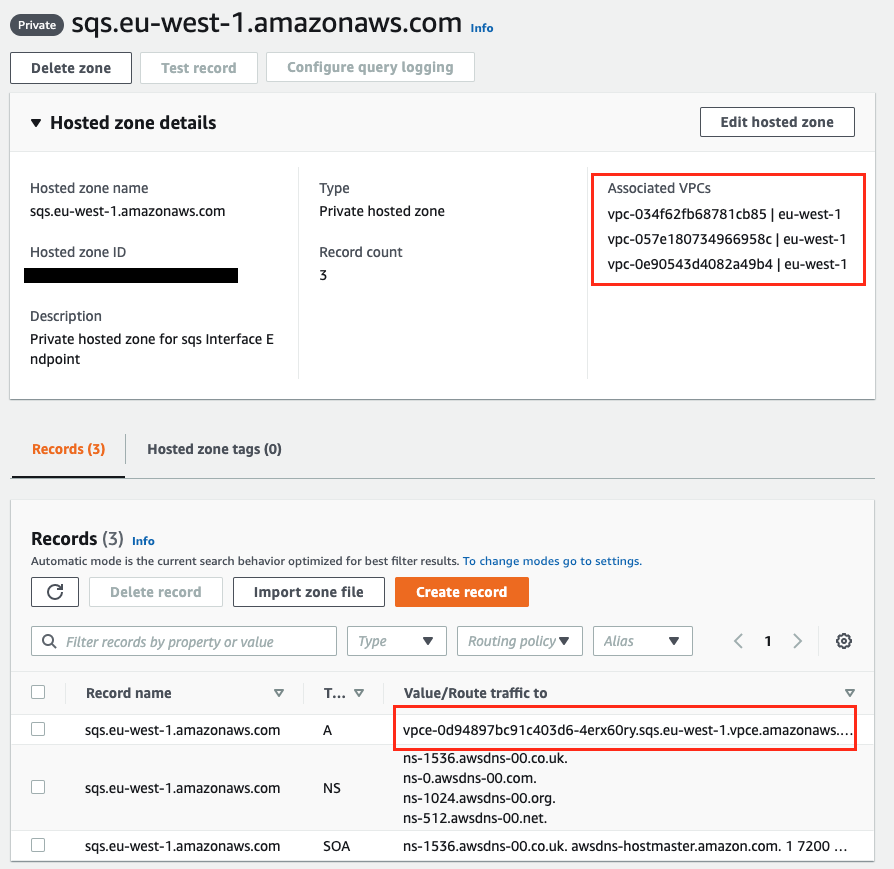
There are also private hosted zones for each VPC interface endpoint. Below you can see the hosted zone for the SQS VPC interface endpoint.
Test the setup
To test the setup, we can create an EC2 instance in the VPC created in account-1, account-2 or account-3 and send a message to an SQS queue created in the same account.
The entire solution is private, with no NAT gateways or Internet Gateways.
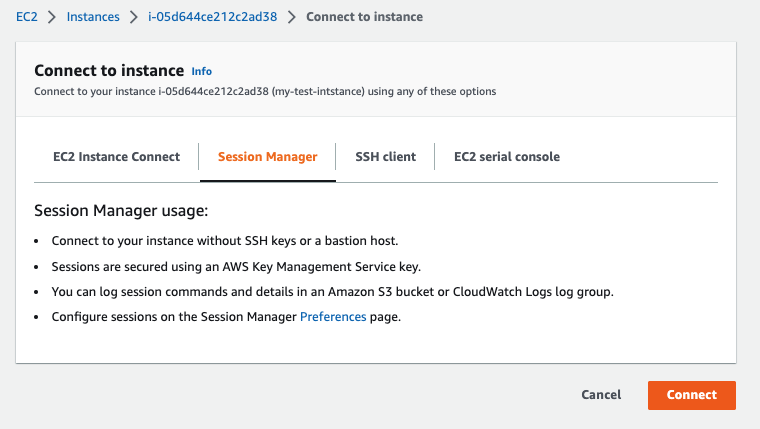
This means that we can only connect to an EC2 instance using Session Manager via its interface VPC endpoints.
Here for we need to create VPC interface endpoints for:
- ssm
- ssmmessages
- ec2messages
Deploy an EC2 in a private subnet and attach an IAM role which has AmazonSQSFullAccess and AmazonSSMManagedInstanceCore managed policies attached.
If the solution is deployed correctly, you should be able to connect to your EC2 instance using Session Manager.
Also create an SQS queue called demo-queue in the same account. The queue can be encrypted if you deployed the KMS VPC interface endpoint.
Currently, most AWS EC2s still have AWS CLI v1 installed. AWS CLI v1 connects to a deprecated endpoint for SQS, so we need to install AWS CLI v2 on the EC2. Our instance does not have internet access so we will use
scp to upload the installer to the instance.
To do this, we need to configure our terminal to use Session Manager.First, programatically connect to the AWS account where you’re EC2 is deployed (With a role or access keys). Then follow the steps described here to configure your local terminal to connect with Session Manager. Download AWS CLIv2 to your local machine and then use
scp to upload it to the private instance.$ scp awscliv2.zip ec2-user@i-05d644ce212c2ad38:/home/ec2-user
Add public key /Users/xxx/.ssh/id_rsa.pub for ec2-user at instance i-05d644ce212c2ad38 for 60 seconds
Start ssm session to instance i-05d644ce212c2ad38
...
After uploading the installer, you can ssh to the instance and install AWS CLI v2.
$ ssh ec2-user@i-05d644ce212c2ad38
$ unzip awscliv2.zip
$ sudo ./aws/install
$ aws --version
aws-cli/2.9.9 Python/3.9.11 Linux/5.10.157-139.675.amzn2.x86_64 exe/x86_64.amzn.2 prompt/off
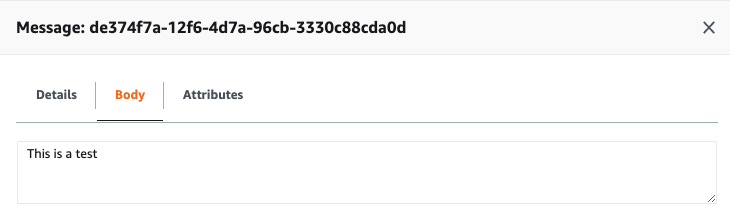
Now use AWS CLI v2 to send a message to the demo-queue.
$ aws sqs send-message --queue-url https://sqs.eu-west-1.amazonaws.com/<account-id>/demo-queue --message-body "This is a test" --region eu-west-1
{
    "MD5OfMessageBody": "ce114e4501d2f4e2dcea3e17b546f339",
    "MessageId": "de374f7a-12f6-4d7a-96cb-3330c88cda0d"
}
Check in the AWS console for the message.
We used a private VPC interface endpoint in a different account to send a message from an EC2 to an SQS queue! You can perform an
nslookup from within the EC2 instance to see that it resolves to private IPs within the range our centralized VPC its CIDR block.$ nslookup sqs.eu-west-1.amazonaws.com
Server: 192.168.100.2
Address: 192.168.100.2#53
Non-authoritative answer:
Name: sqs.eu-west-1.amazonaws.com
Address: 10.0.3.201
Name: sqs.eu-west-1.amazonaws.com
Address: 10.0.1.183
Name: sqs.eu-west-1.amazonaws.com
Address: 10.0.2.157
Clean up
To clean up the solution, you have to terminate the EC2 and delete the corresponding security group. Next you can just use Terraform:
$ terraform destroy -var-file values.tfvars
Conclusion
If you need to use VPC interface endpoints in your organization, it may be beneficial to create a centralized solution for them, so that other VPCs can use these endpoints without having to create VPC interface endpoints in each account. This approach has the benefits of reducing costs, improving security, and enhancing performance.
Unfortunately, Terraform providers do not make it very easy to create a reusable solution like this. However, you have the option to exclude the providers from the solution and deploy it in a more modularized way in specific accounts. The use of providers in this case was intended to simplify the deployment process by allowing everything to be deployed with a single command.