I’ve been blogging for a few years now. I write about CI/CD, containers, automation tools and my experiences in the cloud. I’ve published some blogs on Medium and dev.to, but I missed the satisfaction of publishing under my own domain. As a Cloud & DevOps engineer, I want to be responsible to host my own website!
As an AWS Community Builder it’s not entirely coincidental that I choose AWS as cloud provider to host my website. The infrastructure is implemented with CDK TypeScript.
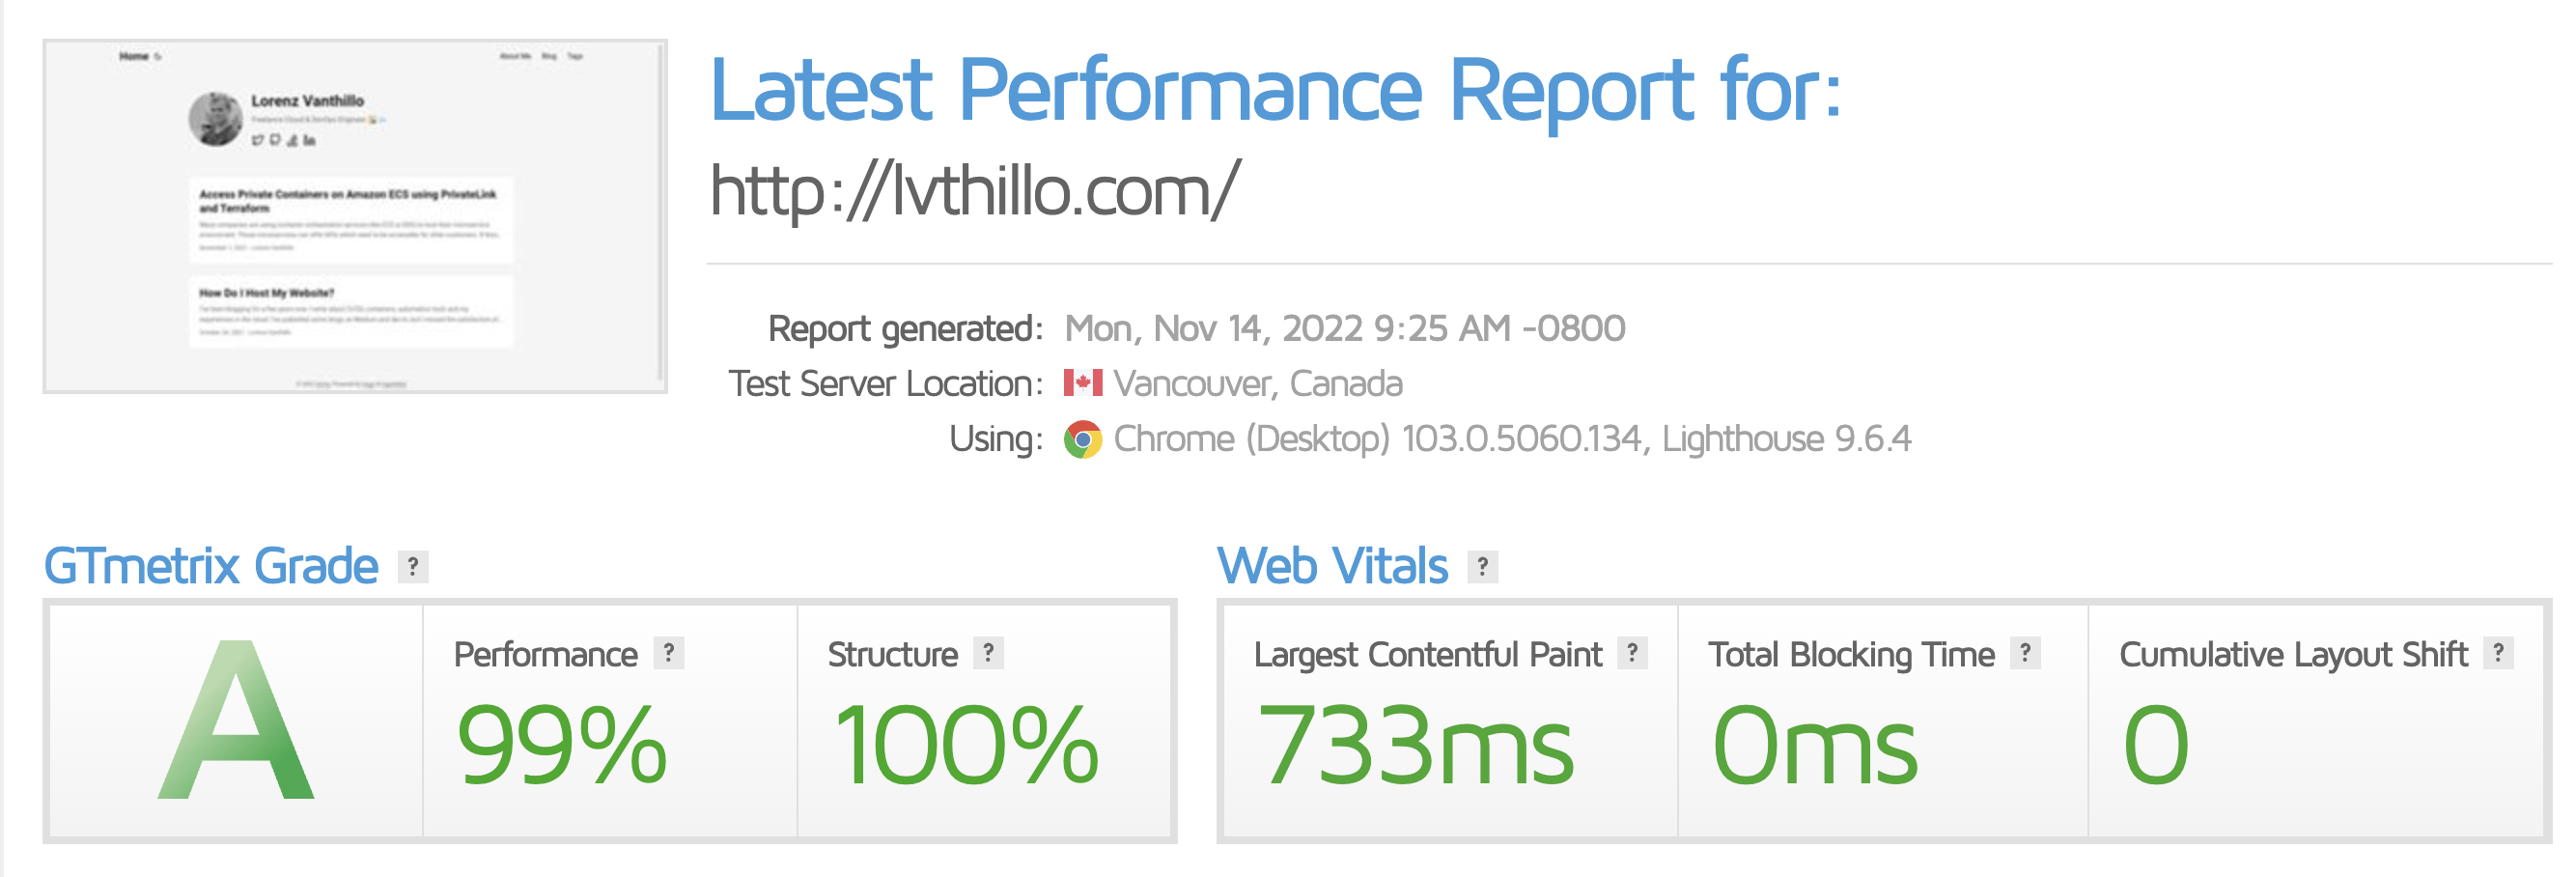
The website itself should be very fast and support the markdown language.
After doing some research I decided to go with Hugo as open-source static site generator.
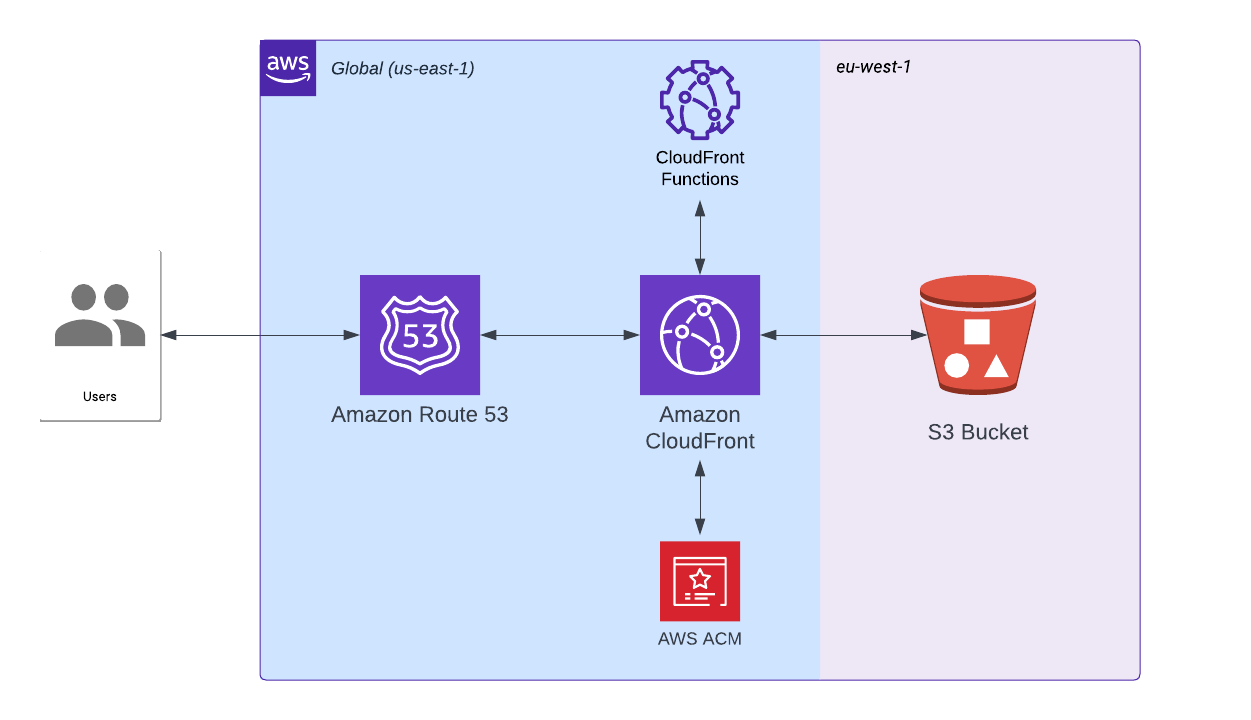
Architecture
Using a combination of S3 and CloudFront is a very common pattern to host a static website inside AWS.
S3 is a very cheap object storage service to where I can upload my site content. It is a regional service, which means my content resides in one geographic region. I’m using the Dublin, Ireland region (eu-west-1).
An important disadvantage of keeping my data in one geographical region is increased latency. I’m living in Belgium so for me it would be fine to connect with the eu-west-1 region, which is located in Ireland,
but people living in Australia can face some increased latency. AWS offers CloudFront as a solution against latency issues. Amazon CloudFront is a fast content delivery network (CDN) service that securely delivers my data to people globally with low latency,
and high transfer speeds.
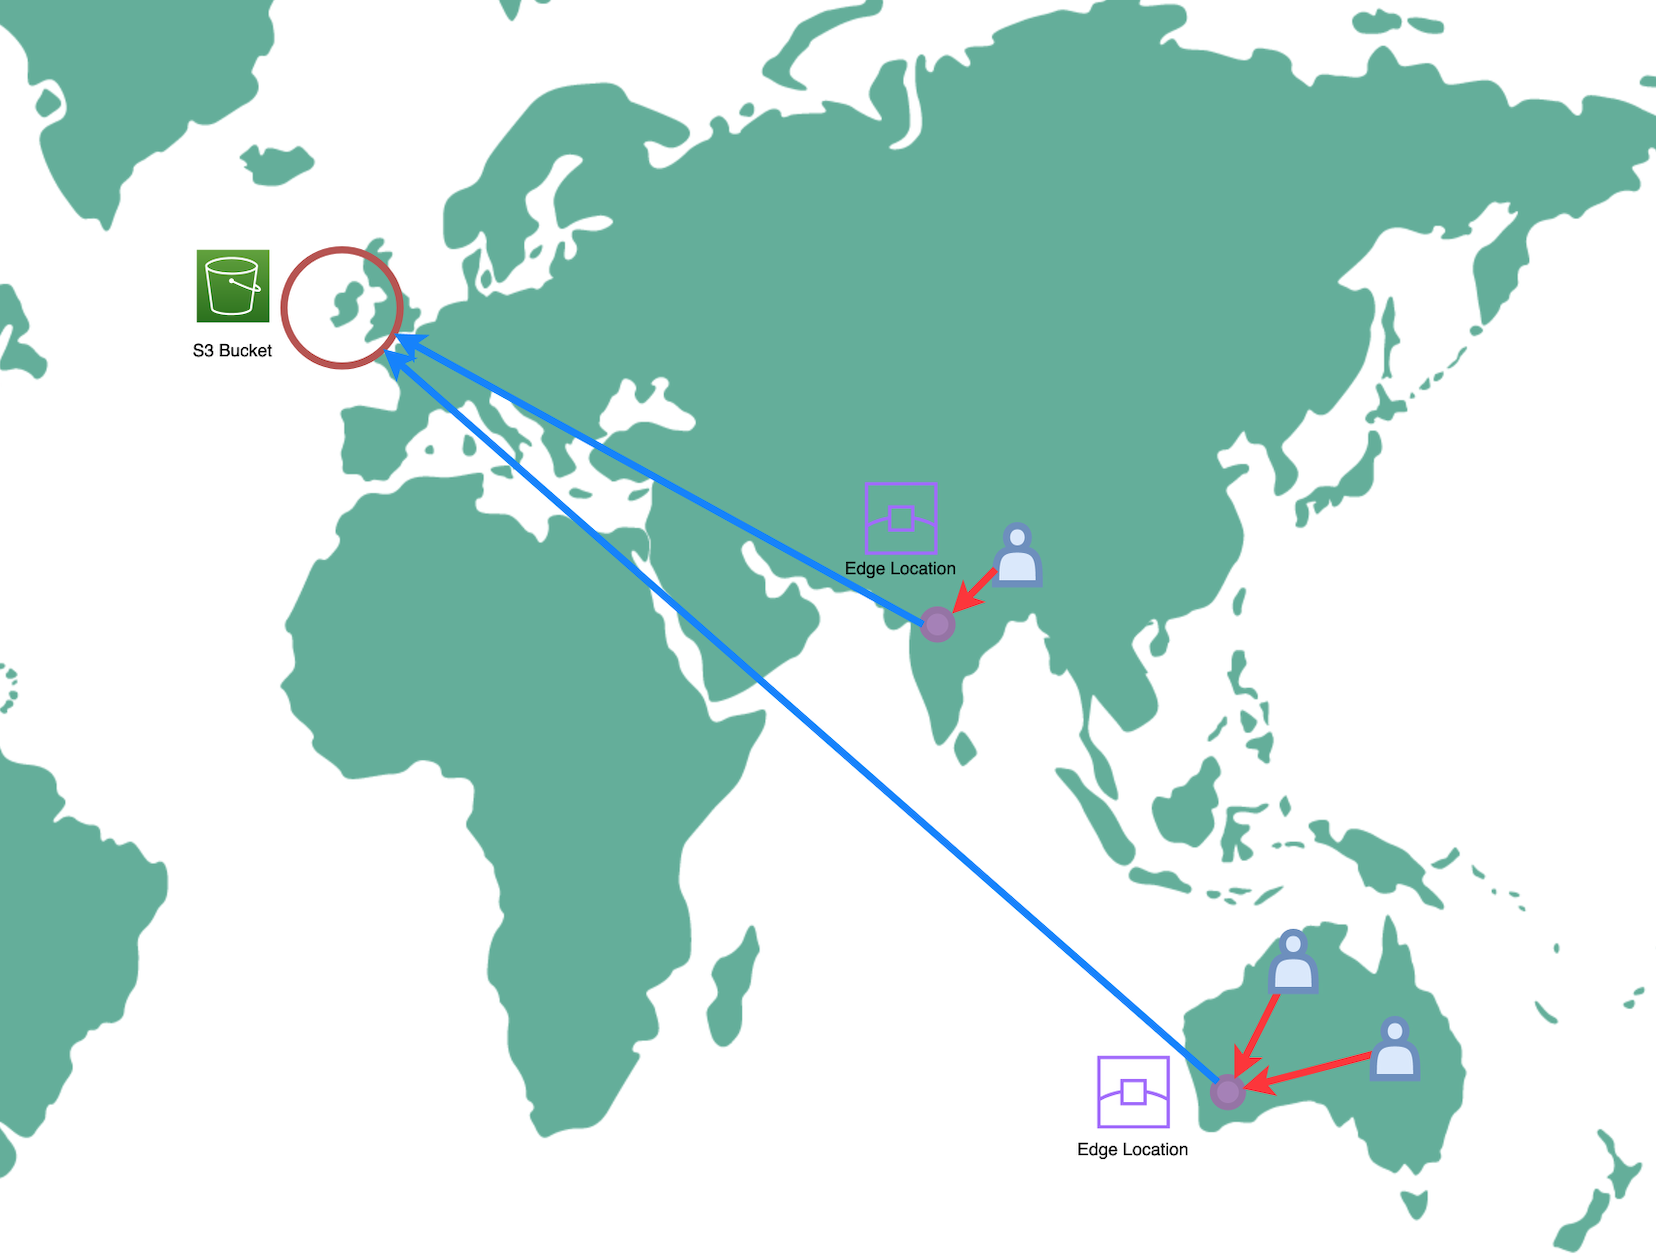
CloudFront makes use of Edge locations where the data will be cached close to the visitors. The data is cached for 24h by default. The red arrows below show the low latency between visitors and the Edge locations. The blue lines represent the one time connection an Edge location needs to make to the bucket to download the content and store (cache) it in the Edge location.
Now let’s start with going over the CDK code. We’ll start at the bottom of our architecture, which is the S3 bucket, and we’ll work our way up to the top which is our CloudFront distribution and DNS configuration.
Amazon S3
To create an S3 bucket in CDK TypeScript, we can use the S3 bucket construct. Just keep everything private.
const siteBucket = new s3.Bucket(this, 'SiteBucket', {
  bucketName: props.domainName,
  publicReadAccess: false,
  encryption: s3.BucketEncryption.S3_MANAGED,
  blockPublicAccess: s3.BlockPublicAccess.BLOCK_ALL,
  removalPolicy: RemovalPolicy.RETAIN,
  autoDeleteObjects: false,
})
AWS CloudFront Origin Access Identity
Before we can create our CloudFront distribution, we have to create an Origin Access Identity to create a private and secure connection between our distribution and our S3 bucket. In the near future, we’ll have to update this to an Origin Access Control but there is no CDK support yet.
const cloudfrontOAI = new cloudfront.OriginAccessIdentity(
  this,
  'cloudfront-OAI',
  {
    comment: `OAI for ${props.domainName}`,
  }
)
We can allow bucket access by updating the bucket policy and allow s3:GetObject for our OAI. Later in this post, we will use this OAI to establish a secure connection between our distribution and our S3 bucket.
siteBucket.addToResourcePolicy(
  new iam.PolicyStatement({
    actions: ['s3:GetObject'],
    resources: [siteBucket.arnForObjects('*')],
    principals: [
      new iam.CanonicalUserPrincipal(
        cloudfrontOAI.cloudFrontOriginAccessIdentityS3CanonicalUserId
      ),
    ],
  })
)
AWS Certificate Manager
We also need a valid certificate for our domain.
So let’s first create a valid ACM Certificate. This certificate should be created in us-east-1! CloudFront is a global service. In AWS it’s presented in us-east-1. That’s why we have to create our certificate in that region.
const certificate = new acm.DnsValidatedCertificate(
  this,
  'SiteCertificate',
  {
    domainName: domainName,
    subjectAlternativeNames: [fullDomainName],
    hostedZone: zone,
    region: 'us-east-1', // Cloudfront
  }
)
AWS CloudFront Functions
Another dependency for our distribution is a CloudFront function which redirects https://www.lvthillo.com to https://lvthillo.com. Without this function both www and non-www will work, but this is bad in SEO perspective. Google will handle it as two separate websites. The Lambda code of our function can be viewed here.
Now we create the new CloudFront function, we will associate it with the distribution during the distribution its creation.
const redirectFileCodeOptions: cloudfront.FileCodeOptions = {
  filePath: 'lambda/redirect.js',
}

const redirectLambda = new cloudfront.Function(this, 'redirect', {
  code: cloudfront.FunctionCode.fromFile(redirectFileCodeOptions),
})
AWS CloudFront Response Headers Policy
Having a response headers policy is not a hard requirement to create a CloudFront distribution. Still, I would recommend to implement it. It can make your website more secure.

The score of my website is B, while it would be F without defining security headers. I don’t have an A-score because I’m using unsafe-inline in my CSP. It’s better to avoid this, but I have to add it for now because my Hugo template requires it. See below the CDK code for my security headers.
const responseHeadersPolicy = new cloudfront.ResponseHeadersPolicy(
  this,
  'ResponseHeadersPolicy',
  {
    responseHeadersPolicyName: 'CustomSecurityHeadersPolicy',
    comment: 'Custo Security Headers policy',
    securityHeadersBehavior: {
      contentSecurityPolicy: {
        contentSecurityPolicy:
          "default-src 'none'; script-src 'self' https://*.googletagmanager.com 'unsafe-inline'; img-src 'self' https://*.google-analytics.com https://*.googletagmanager.com; connect-src https://*.google-analytics.com https://*.analytics.google.com https://*.googletagmanager.com; style-src 'self' 'unsafe-inline' https://cdnjs.cloudflare.com; object-src 'none'; form-action 'self'",
        override: true,
      },
      contentTypeOptions: { override: true },
      frameOptions: {
        frameOption: cloudfront.HeadersFrameOption.DENY,
        override: true,
      },
      referrerPolicy: {
        referrerPolicy: cloudfront.HeadersReferrerPolicy.NO_REFERRER,
        override: true,
      },
      strictTransportSecurity: {
        accessControlMaxAge: Duration.seconds(15768000),
        includeSubdomains: true,
        override: true,
      },
      xssProtection: { protection: true, modeBlock: true, override: true },
    },
  }
)
AWS CloudFront
Now all dependencies are implemented, we can finally create our CloudFront distribution! See how we are using those dependencies: an OAI, an ACM Certificate, a response header policy and a CloudFront function. I want to use my own domain name, so I add an alternate domain name to my CloudFront distribution.
const distribution = new cloudfront.Distribution(this, 'SiteDistribution', {
  certificate: certificate,
  defaultRootObject: 'index.html',
  domainNames: [domainName, fullDomainName],
  minimumProtocolVersion: cloudfront.SecurityPolicyProtocol.TLS_V1_2_2021,
  httpVersion: cloudfront.HttpVersion.HTTP2_AND_3,
  errorResponses: [
    {
      httpStatus: 403,
      responseHttpStatus: 403,
      responsePagePath: '/404.html',
      ttl: Duration.minutes(30),
    },
  ],
  defaultBehavior: {
    origin: new cloudfront_origins.S3Origin(siteBucket, {
      originAccessIdentity: cloudfrontOAI,
    }),
    responseHeadersPolicy: responseHeadersPolicy,
    compress: true,
    allowedMethods: cloudfront.AllowedMethods.ALLOW_GET_HEAD_OPTIONS,
    viewerProtocolPolicy: cloudfront.ViewerProtocolPolicy.REDIRECT_TO_HTTPS,
    functionAssociations: [
      {
        eventType: cloudfront.FunctionEventType.VIEWER_REQUEST,
        function: redirectLambda,
      },
    ],
  },
})
Amazon Route53
To associate my domain with the distribution I have to create an alias and a CNAME record in Route53. The alias will associate lvthillo.com with the CloudFront distribution domain, such as d111111abcdef8.cloudfront.net.
The CNAME record will just forward www.lvthillo.com to lvthillo.com. This will work fine in combination with our CloudFront function.
new route53.ARecord(this, 'SiteAliasRecord', {
  recordName: domainName,
  target: route53.RecordTarget.fromAlias(
    new targets.CloudFrontTarget(distribution)
  ),
  zone,
})

new route53.CnameRecord(this, 'SiteCnameRecord', {
  recordName: fullDomainName,
  domainName: domainName,
  zone,
})
That’s it! You can find all CDK code on my GitHub. Check the README to create your own infrastructure for a static website using CDK TypeScript.
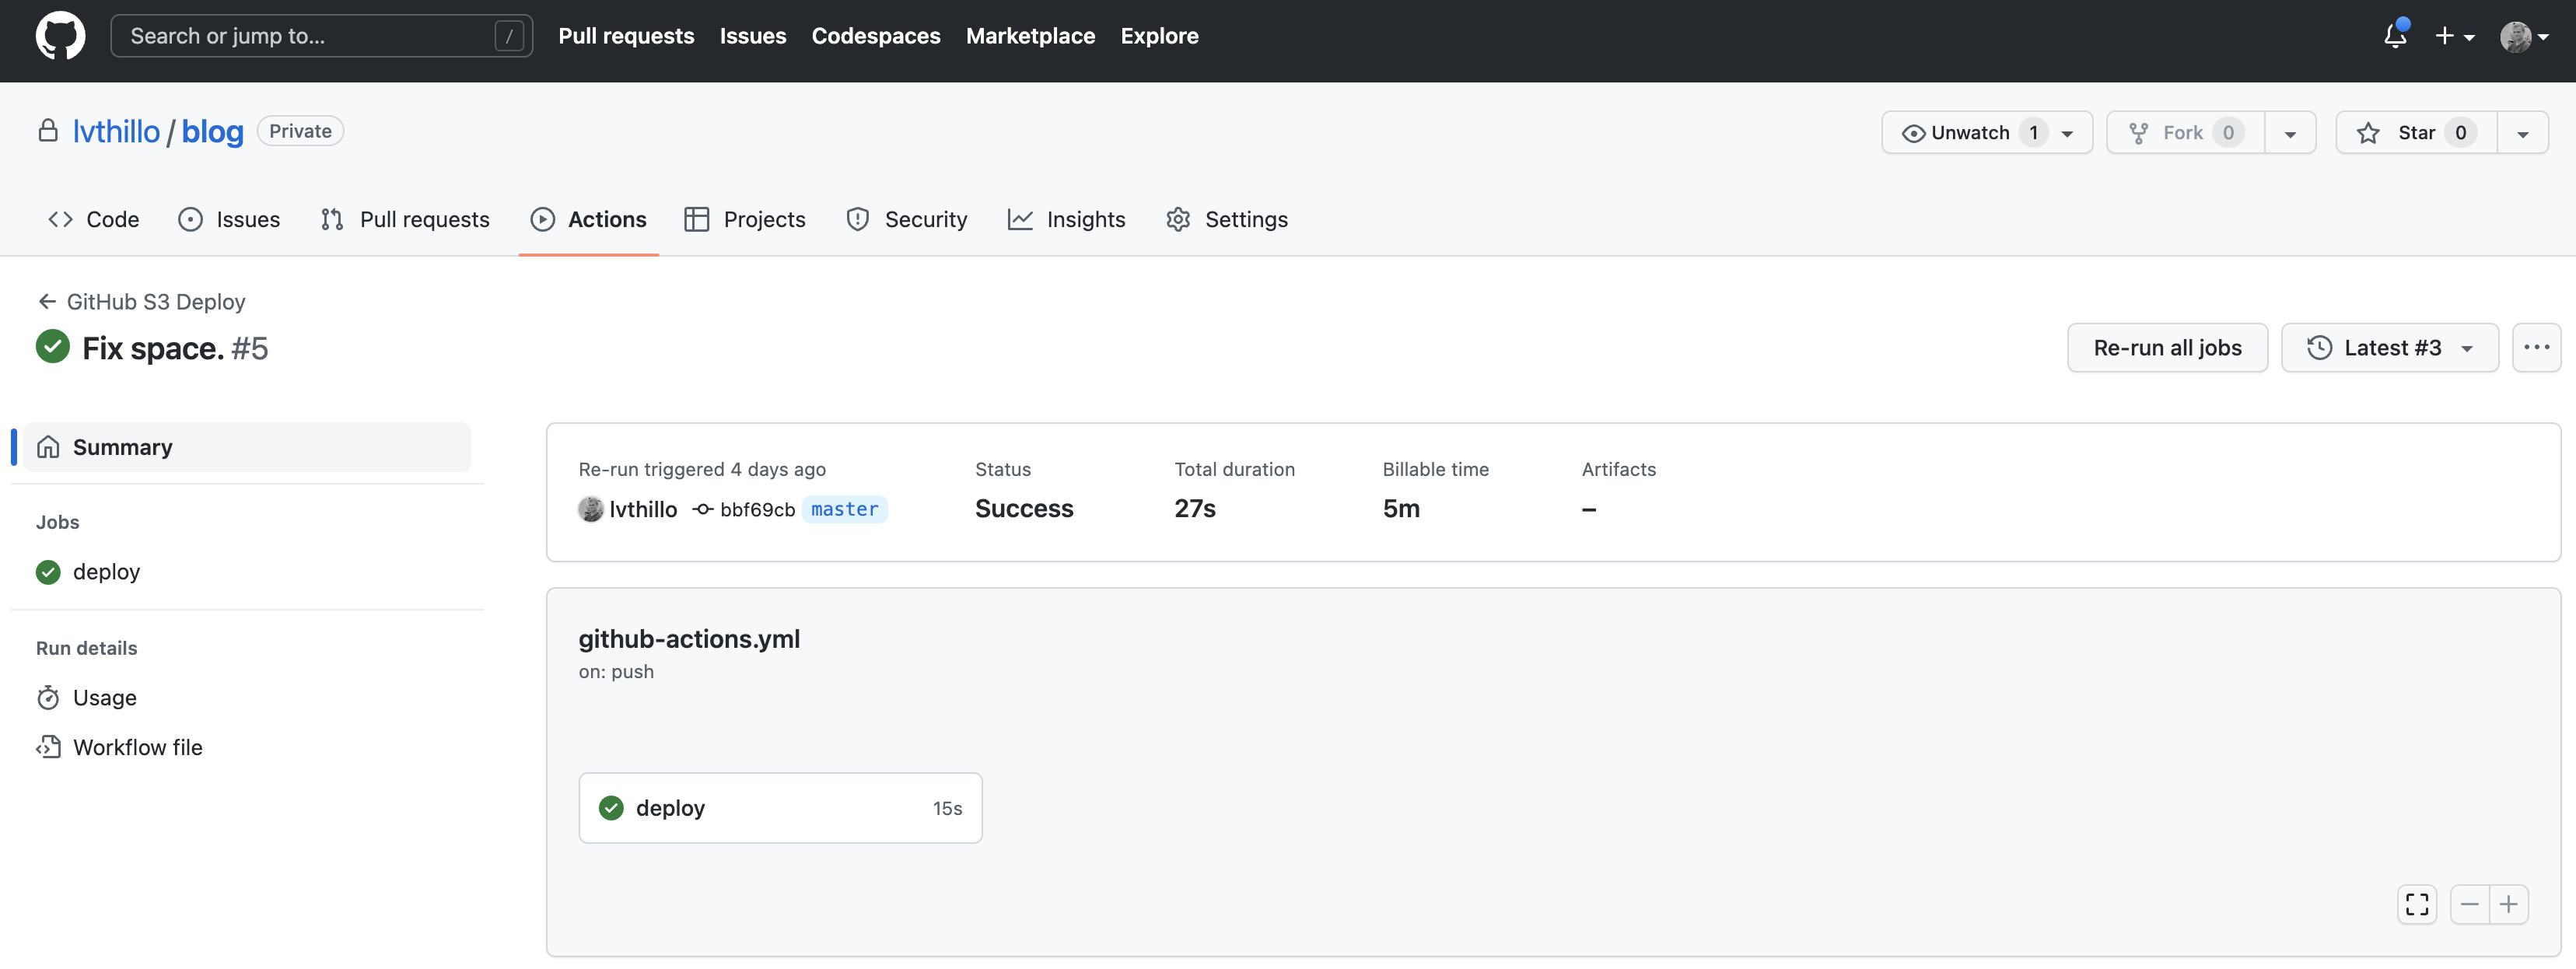
Website Deployment using GitHub Actions
I’m using GitHub Actions to deploy my website updates to S3. My website code is stored in a private GitHub repository. Every commit on master will be released to my production website. I have configured OpenID Connect in AWS and stored my secrets in GitHub.
name: GitHub S3 Deploy
'on':
  push:
    branches:
      - master
  pull_request: null

env:
  DEPLOY_ROLE: ${{ secrets.DEPLOY_ROLE }}
  BUCKET_NAME: ${{ secrets.BUCKET_NAME }}
  AWS_REGION: eu-west-1
  HUGO_VERSION: 0.105.0

permissions:
      id-token: write
      contents: read

jobs:
  deploy:
    runs-on: ubuntu-latest
    environment: Production
    steps:
      - name: Checkout
        uses: actions/checkout@v3
        with:
          submodules: true
          fetch-depth: 0
      - name: Setup Hugo
        uses: peaceiris/actions-hugo@v2
        with:
          hugo-version: ${{ env.HUGO_VERSION }}
      - name: Build
        run: hugo --minify
      - name: Configure AWS Credentials
        uses: aws-actions/configure-aws-credentials@v1
        with:
          role-to-assume: ${{ env.DEPLOY_ROLE }}
          role-session-name: OIDCSession
          aws-region: ${{ env.AWS_REGION }}
      - run: aws s3 sync public/ "s3://${{ env.BUCKET_NAME }}/"
        shell: bash
Conclusion
Now I have a fully automated way to deploy and host my website. I’m using AWS CDK to deploy the infrastructure to host my static website and my website content is automatically deployed using GitHub actions!
This post was updated in November 2022